Monday, 16 December 2013

Linking Access 2013 to Microsoft SQL Server Part - 3

Introduction:

Here I will explain how to Linking ms access database to SQL Server Part - 3.

Description:
In my previous post I explained how to create odbc connection. here I will explain how to connect MS-Access to odbc connection.

Step 14: Open MS-Access and select blank desktop database.


Step 15: Select Database Location and give database Name to click on create.


Step 16: Under External Data Menu click on ODBC Database.
Step 17: Select Link to the data source by creating linked table and click on ok.
Step 18: On Machine Data source select your odbc connection and click on ok.

Step 19: Enter the password and click on ok.

Step 20: After entering password select which table you have to synchronize.

Step 21: After selecting table click on ok the selected data will automatically populated from ms-access.


Step 22: Finally go to Sql server right click on your database(which is linked db) and go to properties, under permission tab select you odbc connection to give a permissions which you want explicitly.

Happy coding!...

If you have any queries please leave a comment.....

Friday, 13 December 2013

Linking Access 2013 to Microsoft SQL Server Part - 2

Introduction:

Here I will explain how to Linking ms access database to SQL Server Part - 2.

Description:
In my previous post I explained how to create login and how to open odbc connection. here I will explain how to create odbc connection between sql server and ms access.

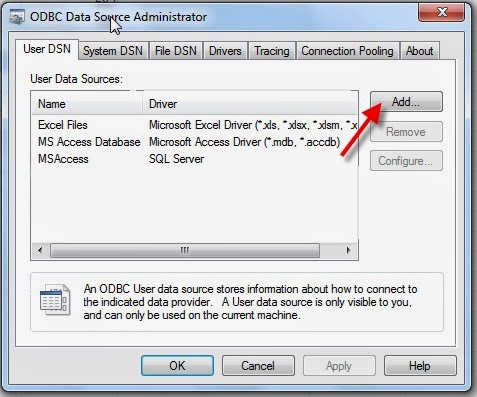
Step 6: After opening ODBC window hit the Add button which is shown below.

Step 7: Select Sql server and clock on finish betton.

Step 8: After that Give a Name which is shown in sql server as well in odbc window, and description and finally select database to click on Next button.
Step 9: select the windows/sql authentication and give your own password which will ask when you connect the MS Access database and click on next.

Step 10: Select database to click on Next.

Step 11: And finally click on language settings and click on finish button.
Step 12: After the window show you all the details, then click on Test Data Source.
Step 13: After that will show you success/failure of the odbc connection.
Step 14: After click on ok button, Finally in odbc window shown creating your odbc connection name.

To continue this hit the Part - 3.

Linking Access 2013 to Microsoft SQL Server Part - 1

Introduction:

Hi here I will explain how to Linking ms access database to SQL Server.

Description:

Before Linking MS Access to SQL Server we need to fallow the some steps which is given below.

Step 1: Open your SQL Server => on security tab right click on Login tab hit the New Login.
Step 2: On General tab give a Login Name and select any one of windows/sql authentication and select a database which is shown on below picture.
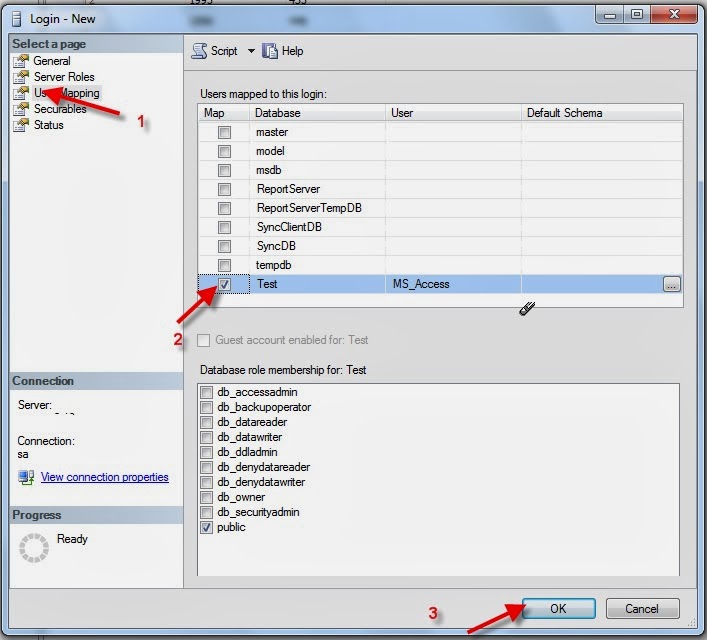
Step 3: And User Mapping tab check the your database and hit the Ok button.

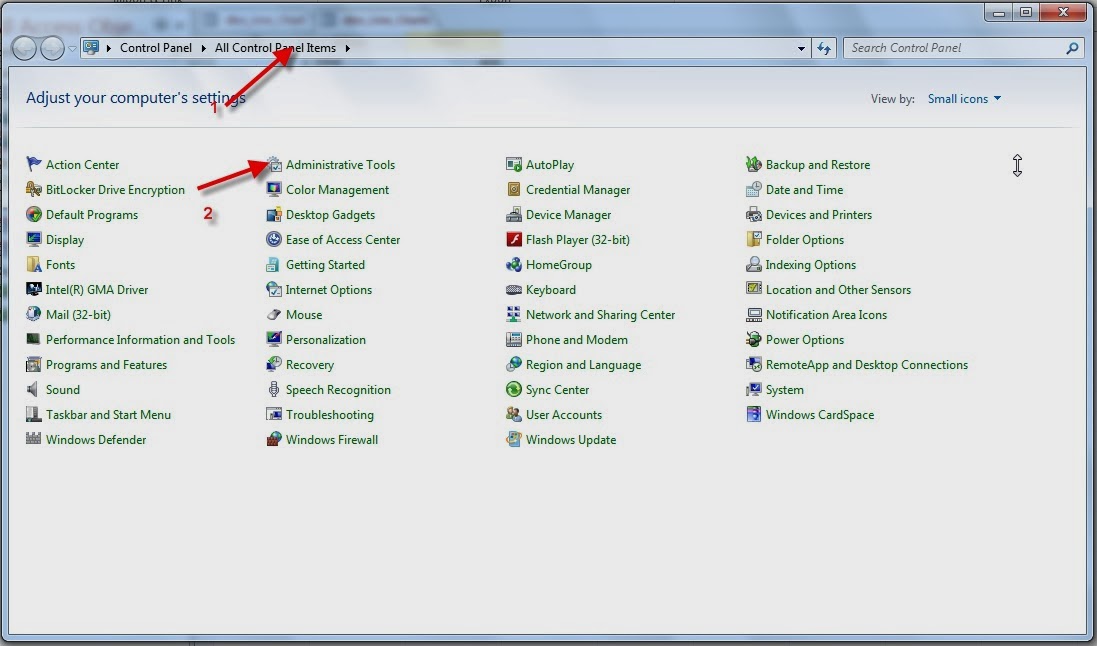
Step 4: After creating User from sql server go to control panel and double click on Administration Tools.

Step 5: On Administration Tools double click on Data Source(ODBC).

To Continue this Click on Part - 2


Thursday, 12 December 2013

Connection With Ms-Access Database and C#

Introduction:

Here I will explain how to Connection With Ms-Access Database and C#.

Description:


This post will have a description of how to work with Office access and C#. This will cover the connection with C# and your office access file .mdb and normal CRUD operations.

Connection With Ms-Access DB Database and C#:

The following code provide a method that return an OleDbConnection object to you.

private static OleDbConnection GetConnection()
        {
            OleDbConnection oledbconn = new OleDbConnection(@"Provider=Microsoft.ACE.OLEDB.12.0;Data Source=C:\Users\manojkumar\Documents\manojkumar\Databases\college.accdb;");
            oledbconn.Open();
            return oledbconn;
        }

Let We have a product table in customer_Table.mdb file


                                             Fig: Customer_Table Table
Retrieve: Select Operation:

Now, we want to select the list of Customer_Table ( in the above fig) .

So using the connection we select an OleDbDataAdapter an eventually fill the customer_table object.


public void GetCustomerList()
        {
            OleDbConnection oledbconn = GetConnection();
            OleDbCommand oledbcmd = new OleDbCommand("select * from customer_table", oledbconn);
            OleDbDataAdapter da = new OleDbDataAdapter(oledbcmd);
            DataSet ds = new DataSet();
            da.Fill(ds);
            oledbconn.Close();
            dgcustomer.DataSource = ds.Tables[0];
        }

CREATE: Insert Operation:

We can insert easily:


private void button1_Click(object sender, EventArgs e)
        {
            try
            {
                OleDbConnection oledbconn = GetConnection();
                OleDbCommand oledbcmd = new OleDbCommand("insert into customer_table(FirstName,LastName,CreditLimit,State) values('" + txtFirstName.Text + "','" + txtLastName.Text + "'," + txtCreditLimit.Text + ",'" + txtState.Text + "')", oledbconn);

                int ResultValue = oledbcmd.ExecuteNonQuery();
                oledbconn.Close();
                if (ResultValue > 0)
                    GetCustomerList();
                Clear();
            }
            catch (OleDbException ox)
            {
                MessageBox.Show(ox.Message, "Sample Application");
            }
            catch (ArgumentException ax)
            {
                MessageBox.Show(ax.Message, "Sample Application");
            }
            catch (Exception ex)
            {
                MessageBox.Show(ex.Message, "Sample Application");
            }
        }

 After Insert Clear the Fields..

        private void Clear()
        {
            txtFirstName.Text = "";
            txtLastName.Text = "";
            txtCreditLimit.Text = "";
            txtState.Text = "";
        }

Finally we got a result form like this


I am sure you can help yourself with the Update and Delete operation.

Hope this will help.


Wednesday, 11 December 2013

Synchronizing SQL Server 2 Databases in c#.net

Introduction:

Here I will explain how to Synchronizing SQL Server 2 Databases in c#.net.

One of our Client have maintain a website which having database and MS Dynamics Navision for
manual orders.  If any new Items placed to the company they need to change the product
information in website (i.e it is reflected to the website database)  as well to change the
product information in MS Dynamics Navision. At this situation we implemented the both databases
to synchronize to run the Windows Service, now no need to change the data both side in manually.

Description:

Development Environment Setup
———————————————-

1. Visual Studio 2010

2. SQL Server 2008 or SQL Express

3. Download and install Microsoft Sync SDK 2.1 (http://www.microsoft.com/en-us/download/details.aspx?displaylang=en&id=23217)

4. Add reference to the below library's.

Microsoft.Synchronization.dll
Microsoft.Synchronization.Data.dll
Microsoft.Synchronization.Data.SqlServer.dll


5. Create a database named 'SyncDB' using the below script.


USE [master]
GO

IF EXISTS(SELECT name FROM sys.databases WHERE name = 'SyncDB')
DROP DATABASE SyncDB

CREATE DATABASE [SyncDB]
GO

USE [SyncDB]
GO

CREATE TABLE [dbo].[Products](
[ID] [int] NOT NULL,
[Name] [nvarchar](50) NOT NULL,
[ListPrice] [money] NOT NULL
      
      CONSTRAINT [PK_Products] PRIMARY KEY CLUSTERED ([ID] ASC)
)

GO

CREATE TABLE [dbo].[Orders](
[OrderID] [int] NOT NULL,
[ProductID] [int] NOT NULL,
[Quantity] [int] NOT NULL,
[OriginState] [nvarchar](2) NOT NULL,
    CONSTRAINT [PK_Orders] PRIMARY KEY CLUSTERED ([OrderID] ASC,[ProductID] ASC)
)
GO

ALTER TABLE [dbo].[Orders]  WITH CHECK ADD  CONSTRAINT [FK_Orders_Products] FOREIGN KEY([ProductID])
REFERENCES [dbo].[Products] ([ID])
GO

ALTER TABLE [dbo].[Orders] CHECK CONSTRAINT [FK_Orders_Products]
GO

INSERT INTO Products VALUES (1, 'PC', 400)
INSERT INTO Products VALUES (2, 'Laptop', 600)
INSERT INTO Products VALUES (3, 'NetBook', 300)
INSERT INTO Orders VALUES (1, 1, 2, 'NC')
INSERT INTO Orders VALUES (2, 2, 1, 'NC')
INSERT INTO Orders VALUES (3, 1, 5, 'WA')
INSERT INTO Orders VALUES (3, 3, 10, 'WA')
INSERT INTO Orders VALUES (4, 2, 4, 'WA')
6. Create SyncClientDB.With out any tables in it.

HOW SYNC WORKS

To synchronize SQL Server database with a SQL Client database we will complete the tasks below.

1. Define the scope based on the tables from the SQL Server database, then provision the SQL Server and SQL client databases.This will prepare the SQL Server and SQL client databases for Synchronization.

 2. Synchronize the SQL Server and SQL client databases after they have been configured for synchronization as per step 1.

 3. Optionally if you wish you can use the SqlSyncDeprovisioning class to deprovision the specified scope and remove all associated synchronization elements from the database.

1: Scope the SQL Server database and then provision SQL client databases.

      public static void SetUp()
        {
            try
            {
                SqlConnection serverConn;
                SqlConnection clientConn;
                Server_Client_Connection(out serverConn, out clientConn);
                // Create a scope named "product" and add tables to it.
                DbSyncScopeDescription productScope = new DbSyncScopeDescription("product");
                // Select the colums to be included in the Collection Object
                Collection<string> includeColumns = new Collection<string>();
                includeColumns.Add("ID");
                includeColumns.Add("Name");
                includeColumns.Add("ListPrice");
                // Define the Products table.
                DbSyncTableDescription productDescription = SqlSyncDescriptionBuilder.GetDescriptionForTable("dbo.Products", includeColumns, serverConn);
                // Add the Table to the scope object.   
                productScope.Tables.Add(productDescription);
                // Create a provisioning object for "product" and apply it to the on-premise database if one does not exist.
                SqlSyncScopeProvisioning serverProvision = new SqlSyncScopeProvisioning(serverConn, productScope);

                // Filter Rows for the ListPrice column
                //serverProvision.Tables["dbo.Products"].AddFilterColumn("ListPrice");
                //serverProvision.Tables["dbo.Products"].FilterClause = "[side].[ListPrice] < '600'";
                serverProvision.Tables["dbo.Products"].AddFilterColumn("ID");
                serverProvision.Tables["dbo.Products"].AddFilterColumn("Name");
                serverProvision.Tables["dbo.Products"].AddFilterColumn("ListPrice");
                if (!serverProvision.ScopeExists("product"))
                    serverProvision.Apply();
                // Provision the SQL client database from the on-premise SQL Server database if one does not exist.
                SqlSyncScopeProvisioning clientProvision = new SqlSyncScopeProvisioning(clientConn, productScope);

                if (!clientProvision.ScopeExists("product"))
                    clientProvision.Apply();
                Server_Client_Connection_Close(serverConn, clientConn);
            }
            catch (SqlException sx)
            {
                Console.WriteLine("SQL Exception : " + sx.Message);
            }
            catch (Exception ex)
            {
                Console.WriteLine(ex.Message);
            }
        }

2: Synchronize the SQL Server and SQL Client databases

     public static void Synchronize()
        {
            try
            {
                SqlConnection serverConn;
                SqlConnection clientConn;
                Server_Client_Connection(out serverConn, out clientConn);
                // Perform Synchronization between SQL Server and the SQL client.
                SyncOrchestrator syncOrchestrator = new SyncOrchestrator();
                // Create provider for SQL Server
                SqlSyncProvider serverProvider = new SqlSyncProvider("product", serverConn);
                // Set the command timeout and maximum transaction size for the SQL Azure provider.
                SqlSyncProvider clientProvider = new SqlSyncProvider("product", clientConn);
                // Set Local provider of SyncOrchestrator to the server provider
                syncOrchestrator.LocalProvider = serverProvider;
                // Set Remote provider of SyncOrchestrator to the client provider
                syncOrchestrator.RemoteProvider = clientProvider;
                // Set the direction of SyncOrchestrator session to Upload and Download
                syncOrchestrator.Direction = SyncDirectionOrder.UploadAndDownload;
                // Create SyncOperations Statistics Object
                SyncOperationStatistics syncStats = syncOrchestrator.Synchronize();
                // Display the Statistics
                Console.WriteLine("Start Time: " + syncStats.SyncStartTime);
                Console.WriteLine("Total Changes Uploaded: " + syncStats.UploadChangesTotal);
                Console.WriteLine("Total Changes Downloaded: " + syncStats.DownloadChangesTotal);
                Console.WriteLine("Complete Time: " + syncStats.SyncEndTime);
                Server_Client_Connection_Close(serverConn, clientConn);
            }
            catch (SqlException sx)
            {
                Console.WriteLine("SQL Exception : " + sx.Message);
            }
            catch (Exception ex)
            {
                Console.WriteLine(ex.Message);
            }
        }

FULL CODE

     static void Main(string[] args)
        {
            string answer = string.Empty;
            string selection = string.Empty;
            do
            {
                Console.WriteLine("\nEnter a choice below:");
                Console.WriteLine(@"Type 1 to scope the database ( Setup )");
                Console.WriteLine(@"Type 2 to sync the database");
                Console.WriteLine(@"Type 3 to remove scope of the database");
                Console.Write("Enter command: ");
                selection = Console.ReadLine();
                switch (selection)
                {
                    case "1":
                        SetUp();
                        break;
                    case "2":
                        Synchronize();
                        break;
                    case "3":
                        Deprovision();
                        break;
                    default:
                        Console.Write("Invalid Selection Please Enter the Valid Value like 1,2 or 3: ");
                        break;
                }
                Console.Write("Do you wish to continue? (y/n): ");
                answer = Console.ReadLine();
            }
            while (answer.Equals("y"));
        }
        public static void SetUp()
        {
            try
            {
                SqlConnection serverConn;
                SqlConnection clientConn;
                Server_Client_Connection(out serverConn, out clientConn);
                // Create a scope named "product" and add tables to it.
                DbSyncScopeDescription productScope = new DbSyncScopeDescription("product");
                // Select the colums to be included in the Collection Object
                Collection<string> includeColumns = new Collection<string>();
                includeColumns.Add("ID");
                includeColumns.Add("Name");
                includeColumns.Add("ListPrice");
                // Define the Products table.
                DbSyncTableDescription productDescription = SqlSyncDescriptionBuilder.GetDescriptionForTable("dbo.Products", includeColumns, serverConn);
                // Add the Table to the scope object.   
                productScope.Tables.Add(productDescription);
                // Create a provisioning object for "product" and apply it to the on-premise database if one does not exist.
                SqlSyncScopeProvisioning serverProvision = new SqlSyncScopeProvisioning(serverConn, productScope);
                // Filter Rows for the ListPrice column
                //serverProvision.Tables["dbo.Products"].AddFilterColumn("ListPrice");
                //serverProvision.Tables["dbo.Products"].FilterClause = "[side].[ListPrice] < '600'";
                serverProvision.Tables["dbo.Products"].AddFilterColumn("ID");
                serverProvision.Tables["dbo.Products"].AddFilterColumn("Name");
                serverProvision.Tables["dbo.Products"].AddFilterColumn("ListPrice");

                if (!serverProvision.ScopeExists("product"))
                    serverProvision.Apply();
                // Provision the SQL client database from the on-premise SQL Server database if one does not exist.
                SqlSyncScopeProvisioning clientProvision = new SqlSyncScopeProvisioning(clientConn, productScope);

                if (!clientProvision.ScopeExists("product"))
                    clientProvision.Apply();
                Server_Client_Connection_Close(serverConn, clientConn);
            }
            catch (SqlException sx)
            {
                Console.WriteLine("SQL Exception : " + sx.Message);
            }
            catch (Exception ex)
            {
                Console.WriteLine(ex.Message);
            }
        }
        private static void Server_Client_Connection_Close(SqlConnection serverConn, SqlConnection clientConn)
        {
            // Shut down database connections.
            serverConn.Close();
            serverConn.Dispose();
            clientConn.Close();
            clientConn.Dispose();
        }
        private static void Server_Client_Connection(out SqlConnection serverConn, out SqlConnection clientConn)
        {
            // Connection to on  SQL Server database
            serverConn = new SqlConnection(@"Persist Security Info=False;User ID=sa;password=password;Initial Catalog=SyncDB;Data Source=.;");
            // Connection to SQL client database
            clientConn = new SqlConnection(@"Persist Security Info=False;User ID=sa;password=password;Initial Catalog=SyncClientDB;Data Source=.;");
        }
        public static void Synchronize()
        {
            try
            {
                SqlConnection serverConn;
                SqlConnection clientConn;
                Server_Client_Connection(out serverConn, out clientConn);
                // Perform Synchronization between SQL Server and the SQL client.
                SyncOrchestrator syncOrchestrator = new SyncOrchestrator();
                // Create provider for SQL Server
                SqlSyncProvider serverProvider = new SqlSyncProvider("product", serverConn);
                // Set the command timeout and maximum transaction size for the SQL Azure provider.
                SqlSyncProvider clientProvider = new SqlSyncProvider("product", clientConn);
                // Set Local provider of SyncOrchestrator to the server provider
                syncOrchestrator.LocalProvider = serverProvider;
                // Set Remote provider of SyncOrchestrator to the client provider
                syncOrchestrator.RemoteProvider = clientProvider;
                // Set the direction of SyncOrchestrator session to Upload and Download
                syncOrchestrator.Direction = SyncDirectionOrder.UploadAndDownload;
                // Create SyncOperations Statistics Object
                SyncOperationStatistics syncStats = syncOrchestrator.Synchronize();
                // Display the Statistics
                Console.WriteLine("Start Time: " + syncStats.SyncStartTime);
                Console.WriteLine("Total Changes Uploaded: " + syncStats.UploadChangesTotal);
                Console.WriteLine("Total Changes Downloaded: " + syncStats.DownloadChangesTotal);
                Console.WriteLine("Complete Time: " + syncStats.SyncEndTime);
                Server_Client_Connection_Close(serverConn, clientConn);
            }
            catch (SqlException sx)
            {
                Console.WriteLine("SQL Exception : " + sx.Message);
            }
            catch (Exception ex)
            {
                Console.WriteLine(ex.Message);
            }
        }
        public static void Deprovision()
        {
            try
            {
                SqlConnection serverConn;
                SqlConnection clientConn;
                Server_Client_Connection(out serverConn, out clientConn);
                // Create Scope Deprovisioning for Sql Server and SQL client.
                SqlSyncScopeDeprovisioning serverSqlDepro = new SqlSyncScopeDeprovisioning(serverConn);
                SqlSyncScopeDeprovisioning clientSqlDepro = new SqlSyncScopeDeprovisioning(clientConn);
                // Remove the scope from SQL Server remove all synchronization objects.
                serverSqlDepro.DeprovisionScope("product");
                serverSqlDepro.DeprovisionStore();
                // Remove the scope from SQL client and remove all synchronization objects.
                clientSqlDepro.DeprovisionScope("product");
                clientSqlDepro.DeprovisionStore();
                Server_Client_Connection_Close(serverConn, clientConn);
            }
            catch (SqlException sx)
            {
                Console.WriteLine("SQL Exception : " + sx.Message);
            }
            catch (Exception ex)
            {
                Console.WriteLine(ex.Message);
            }
        }

Happy coding!....

If you having any queries please leave a comment...........
 

Friday, 6 December 2013

Create Custom Structural Block in Magento

Introduction:

 
Hi all today I will disscuss about how to Create Custom Structural Block in Magento.


Description:


If you already performed some Magento research, you will know that it is built on a fully modular model that gives great scalability and flexibility for your store. While creating a theme, you are provided with many content blocks that you can place in structural blocks. If you are not sure what they are, please read Designer’s Guide to Magento first. Magento provides few structural blocks by default and many content blocks. This article tells what needs to be in place to create new structural block.

What are structural blocks?

They are the parent blocks of content blocks and serve to position its content blocks within a store page context. Take a look at the image below. These structural blocks exist in the forms of the header area, left column area, right column…etc. which serve to create the visual structure for a store page. Our goal is to create a new structural block called "newreference".


Step 1: Name the structural block

Open the file layout/page.xml in your active theme folder. Inside you will find lines like:
1)
2)
3)
 <block type="core/text_list" name="left" as="left"/>
 <block type="core/text_list" name="content" as="content"/>
 <block type="core/text_list" name="right" as="right"/>
Let's mimic this and add a new line somewhere inside the same block tag.
1
) <block type="core/text_list" name="newreference" as="newreference"/>
Good. Now we told Magento that new structural block exists with the name “newreference”. Magento still doesn’t know what to do with it.

Step 2: Tell Magento where to place it

We now need to point Magento where it should output this new structural block. Let’s go to template/page folder in our active theme folder. You will notice different layouts there. Let’s assume we want the new structural block to appear only on pages that use 2-column layout with right sidebar. In that case we should open 2columns-right.phtml file.
Let's assume we wish the “newreference” block to be placed above the footer. In this case, our updated file could look like this:


<div class="main-container col2-right-layout">
            <div class="main">
                <?php echo $this->getChildHtml('breadcrumbs') ?>
                <div class="col-main">
                    <?php echo $this->getChildHtml('global_messages') ?>
                    <?php echo $this->getChildHtml('content') ?>
                </div>
                <div class="col-right sidebar"><?php echo $this->getChildHtml('right') ?></div>
            </div>
            <div><?php echo $this->getChildHtml('newreference') ?></div>
        </div>

Step 3: Populating structural block

We have the block properly placed, but unfortunately nothing is new on the frontsite. Let’s populate the new block with something. So let’s create new file app/design/frontend/[base]/[default]/template/newreference.phtml with the following content:
1
<h1 style="background-color:yellow">Hello New Reference!</h1>
Go to appropriate layout XML file (page.xml) and add this block to appropriate place (for testing purpose you could place it under “default” handle).


<reference name="newreference">
   <block type="core/template" name="newReferenceBlock" template="newReference.phtml" />
</reference>
Now if you visit your frontend you should see something like this:


 Note, you could include any Magento block this way (you didn’t need to include our newly created:

<block type="core/template" name="newReferenceBlock" template="newReference.phtml" />
). Just be careful to do it properly!

Step 4: Add new reference in a proper way!

Sure that you’ll not modify Magento core files. Revert changes in page.xml and create local.xml file.
Inside of your local.xml file type something like this:


<?xml version="1.0" encoding="UTF-8"?>
<layout>
    <default>
        <reference name="root">
            <block type="core/text_list" name="newreference" as="newreference" translate="label">
                <label>New Reference</label>
            </block>
        </reference>
        <reference name="newreference">
            <block type="core/template" name="newreferenceblock" template="newreference.phtml" />
        </reference>
    </default>
</layout>
That’s it. I hope it will help someone :)

If you have any queries please leave a comment.